引き続き、Ubuntu 14.04 LTS へ CloudStack 4.3 をインストールしてみる
cloudstack-namagement はインストールしたので、環境の設定の続き…
最初に 管理サーバー (Management Server ) を用意して見る
最初の一台は重要らしいので、漏れの無いように書いてかないと….. ^^;
5.Database Server Setting
apache のドキュメントによると MySQL 5.1 で動作確認しているらしい..
MySQL は結構、バージョン依存が強いからなぁ… などと要らぬ心配をしてみる
インストール用のドキュメントに、ubuntu は conf.d/cloudstack.cnf を用意すれば良いよ!
と書いてあり、態々設定項目まで列挙してある
そのまま書いてみて、パラメータの確認をしてみよう…
と思ったけど、どうするんだっけなぁ…
user@ubuntuCS01:/etc/mysql/conf.d$ cat cloudstack.cnf

[mysqld]

innodb_rollback_on_timeout=1

innodb_lock_wait_timeout=600

max_connections=350

log-bin=mysql-bin

binlog-format = 'ROW'

user@ubuntuCS01:/etc/mysql/conf.d$
こんな感じで確認出来るようです
mysql> show variables like 'innodb_roll%';

+----------------------------+-------+

| Variable_name              | Value |

+----------------------------+-------+

| innodb_rollback_on_timeout | ON    |

| innodb_rollback_segments   | 128   |

+----------------------------+-------+

2 rows in set (0.00 sec)
mysql> show variables like 'innodb_lock_wait%';
+--------------------------+-------+
| Variable_name | Value |
+--------------------------+-------+
| innodb_lock_wait_timeout | 600 |
+--------------------------+-------+
1 row in set (0.00 sec)
mysql> show variables like 'max_connections%';
+-----------------+-------+
| Variable_name | Value |
+-----------------+-------+
| max_connections | 350 |
+-----------------+-------+
1 row in set (0.00 sec)
mysql>
次に、cloud というユーザーを追加するようです
コマンドが用意されているようなので、パラメーターを指定して実行します
sudo が必要です
XXXXX は cloud ユーザへのパスワードで、YYYYY は、MySQL の root ユーザーのパスワードの様です
user@ubuntuCS01:~$ sudo cloudstack-setup-databases cloud:XXXXX@localhost --deploy-as=root:YYYYY

[sudo] password for user:

Mysql user name:cloud                                                           [ OK ]

Mysql user password:******                                                      [ OK ]

Mysql server ip:localhost                                                       [ OK ]

Mysql server port:3306                                                          [ OK ]

Mysql root user name:root                                                       [ OK ]

Mysql root user password:******                                                 [ OK ]

Checking Cloud database files ...                                               [ OK ]

Checking local machine hostname ...                                             [ OK ]

Checking SELinux setup ...                                                      [ OK ]

Detected local IP address as 172.16.205.74, will use as cluster management server node IP[ OK ]

Preparing /etc/cloudstack/management/db.properties                              [ OK ]

Applying /usr/share/cloudstack-management/setup/create-database.sql             [ OK ]

Applying /usr/share/cloudstack-management/setup/create-schema.sql               [ OK ]

Applying /usr/share/cloudstack-management/setup/create-database-premium.sql     [ OK ]

Applying /usr/share/cloudstack-management/setup/create-schema-premium.sql       [ OK ]

Applying /usr/share/cloudstack-management/setup/server-setup.sql                [ OK ]

Applying /usr/share/cloudstack-management/setup/templates.sql                   [ OK ]

Processing encryption ...                                                       [ OK ]

Finalizing setup ...                                                            [ OK ]
CloudStack has successfully initialized database, you can check your database configuration in /etc/cloudstack/management/db.properties
user@ubuntuCS01:~$
もし、ここで 3306 への接続がリジェクトされたりして、エラーする場合、Firewall の設定を行うと良いと書いてあります
sudo ufw allow mysql
だそうです
取り敢えず、エラーは無い様子ですので、確認してみます
cloud と cloud_usage という、データーベースを作るようです
user@ubuntuCS01:~$ mysql -u cloud -p cloud

Enter password:

Reading table information for completion of table and column names

You can turn off this feature to get a quicker startup with -A
Welcome to the MySQL monitor. Commands end with ; or \g.
Your MySQL connection id is 48
Server version: 5.5.37-0ubuntu0.14.04.1-log (Ubuntu)
Copyright (c) 2000, 2014, Oracle and/or its affiliates. All rights reserved.
Oracle is a registered trademark of Oracle Corporation and/or its
affiliates. Other names may be trademarks of their respective
owners.
Type 'help;' or '\h' for help. Type '\c' to clear the current input statement.
mysql> show tables;
+--------------------------------------+
| Tables_in_cloud |
+--------------------------------------+
| account |
…
データーベースやテーブルも用意された様子です
暗号化などの記載もありますが、英語のままで翻訳されていませんので、怪しくなってしまうと確認しにくいので、今回は見送ってます
様子見の環境構築だし…
6.NFS Setting
CloudStack の子供達(クラスタと言うらしい)の環境は、プライマリーストレージと言うところに全て格納されるそうです
iSCSI 等でも良いそうでが、NFS で共有する説明がありますのでそれに沿って構築していきます
セカンダリストレージという所は、OS の 起動イメージ ISO 等を格納出来るそうです
要するに、リムーバブルメディア役のファイルを格納する場所かな?便利だな..
今回は NFS サーバー機を用意してないので、管理サーバーで運営していますが..
ディスクボリューム間違えたかな…
Using the Management Server as the NFS Server という項目に沿ってみる…
/export と言うディレクトリーを用意して、/etc/exports に次の様に指定する
user@ubuntuCS01:~$ cat /etc/exports

# /etc/exports: the access control list for filesystems which may be exported

#               to NFS clients.  See exports(5).

#

# Example for NFSv2 and NFSv3:

# /srv/homes       hostname1(rw,sync,no_subtree_check) hostname2(ro,sync,no_subtree_check)

#

# Example for NFSv4:

# /srv/nfs4        gss/krb5i(rw,sync,fsid=0,crossmnt,no_subtree_check)

# /srv/nfs4/homes  gss/krb5i(rw,sync,no_subtree_check)

#

/export  172.16.0.0/255.255.0.0(rw,async,no_root_squash,no_subtree_check)
user@ubuntuCS01:~$ sudo exportfs -r
user@ubuntuCS01:~$
こんな感じかな?
取り敢えずマウントしてみた
user@ubuntuCS01:~$ sudo mount -t nfs 172.16.205.74:/export /media/cdrom/

user@ubuntuCS01:~$ mount

/dev/mapper/ubuntuCS01--vg-root on / type ext4 (rw,errors=remount-ro)

proc on /proc type proc (rw,noexec,nosuid,nodev)

sysfs on /sys type sysfs (rw,noexec,nosuid,nodev)

none on /sys/fs/cgroup type tmpfs (rw)

none on /sys/fs/fuse/connections type fusectl (rw)

none on /sys/kernel/debug type debugfs (rw)

none on /sys/kernel/security type securityfs (rw)

udev on /dev type devtmpfs (rw,mode=0755)

devpts on /dev/pts type devpts (rw,noexec,nosuid,gid=5,mode=0620)

tmpfs on /run type tmpfs (rw,noexec,nosuid,size=10%,mode=0755)

none on /run/lock type tmpfs (rw,noexec,nosuid,nodev,size=5242880)

none on /run/shm type tmpfs (rw,nosuid,nodev)

none on /run/user type tmpfs (rw,noexec,nosuid,nodev,size=104857600,mode=0755)

none on /sys/fs/pstore type pstore (rw)

/dev/sda1 on /boot type ext2 (rw)

systemd on /sys/fs/cgroup/systemd type cgroup (rw,noexec,nosuid,nodev,none,name=systemd)

rpc_pipefs on /run/rpc_pipefs type rpc_pipefs (rw)

172.16.205.74:/export on /media/cdrom type nfs (rw,vers=4,addr=172.16.205.74,clientaddr=172.16.205.74)

user@ubuntuCS01:~$
う~ん..
マウントに時間がかかるぞ?
なんか、大昔にこんな現象に当たったことがあったなぁ…何だっけ?
今回は、名前解決かな?
両方の hosts に IP アドレスと名前を書いてみて、解決(したのか…少し重いかな..)
ここまで順調..
idmapd.conf の Domain を指定しろ!と書いてあるが、今回はこの辺りを端折っている..
あとで、当たらなければ良いけどねぇ…
それと、/export/primary と /export/secondary と言うディレクトリーを用意しておくと良いのかな?
7.VM Template Setting
未踏の領域に突入したなぁ…
最初、KVM で用意すべく準備をしていたのだが、VMware vSphere Hypervisor ESXi 5.5 を使ってみる事にした
取り合えず、次の様にコマンドを実行してみた
user@ubuntuCS01:~$ sudo /usr/share/cloudstack-common/scripts/storage/secondary/cloud-install-sys-tmplt -m /media/cdrom/ -u http://download.cloud.com/templates/4.3/systemvm64template-2014-01-14-master-vmware.ova -h vmware -F

--2014-05-20 15:26:25--  http://download.cloud.com/templates/4.3/systemvm64template-2014-01-14-master-vmware.ova

Resolving download.cloud.com (download.cloud.com)... 207.171.187.118

Connecting to download.cloud.com (download.cloud.com)|207.171.187.118|:80... connected.

HTTP request sent, awaiting response... 200 OK

Length: 305465344 (291M) [application/x-virtualbox-ova]

Saving to: ‘/usr/share/cloudstack-common/scripts/storage/secondary/0a791ccd-c909-424b-b34e-6703232f1c20.ova’
100%[=================================================================================>] 305,465,344 503KB/s in 20m 29s
2014-05-20 15:47:00 (243 KB/s) - ‘/usr/share/cloudstack-common/scripts/storage/secondary/0a791ccd-c909-424b-b34e-6703232f1c20.ova’ saved [305465344/305465344]
File /usr/share/cloudstack-common/scripts/storage/secondary/0a791ccd-c909-424b-b34e-6703232f1c20.ova does not appear to be compressed
Moving to /media/cdrom/template/tmpl/1/8///0a791ccd-c909-424b-b34e-6703232f1c20.ova...could take a while
Successfully installed system VM template to /media/cdrom/template/tmpl/1/8/
user@ubuntuCS01:~$
successfully って表示があるから良いのかなぁ…?
8.UI tuninng
実は、このあと、無茶苦茶塡まってしまったけど、解決したので忘れないように書いておこう…
cloudstack のインストールドキュメントによると、ここでブラウザーベースの UI モードの確認が出来る様になっているそうですが、最初は動かすことが出来ませんでした
で、Tomcat あたりの設定が不完全なのかな?
等と思い、調べ込んでしまった…
実際の処、tomct6 が起動すると邪魔をしますので、止めておきます
また、JDBC ドライバーだと思うのだけれども、 libmysql-java が無いので、追加しておきます
そして、tomcat6 の代わりに cloudstack-manager を起動します
user@ubuntuCS01:~$ sudo /etc/init.d/tomcat6 status

[sudo] password for user:

 * Tomcat servlet engine is running with pid 1073

user@ubuntuCS01:~$ sudo /etc/init.d/tomcat6 stop

 * Stopping Tomcat servlet engine tomcat6                                                                           [ OK ]

user@ubuntuCS01:~$ sudo /etc/init.d/cloudstack-management restart

 * Starting CloudStack-specific Tomcat servlet engine cloudstack-management                                         [ OK ]

user@ubuntuCS01:~$
こんな感じ…
見ての通り、自前の tomcat を cloudstack-manager が起動します
で、tomcat6 を削除してしまおうかと思ったら、 依存関係があるので tomcat6 は削除しない方が良いよ!
と aptitude さんが教えてくれたので、そのままにしておく事にした..
vSphere の設定などは、別ページにするとして、これでいければ、再起動の度に 手動でコマンドを打つのは面倒ですから、rc.d を修正した方が良いと思います
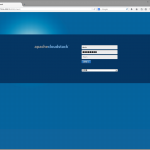
admin , password が初期設定
言語を選択すると、このように流暢な日本語で表示される ^^b
6.1 VMware vSphere Hypervisor
うーん
KVM とか、Xen とか一通り目を通してみたんだけど、いじったことがなかったのでお試しでは敷居が高く、
結局、VMware vSphere Hypervisor ESXi 5.5 の無償版を使ってみることにした
感覚的な CloudStack のイメージが、現実的になるまでこれを使ってみることにしよう…
なれたら、KVM へ推移しよう…
この仮想マシンなら Player でも使えそうだし、何なら、ESXi 用にもう一台用意すればいいしね…
と思い、vSphere をインストールして、試しに、 Windows Vista を入れてみた
vSphere の構成は完了…
管理サーバーの構成が KVM のつもりで進行してしまったので、再度チューニングしないとダメかな…
再インストールするなら、それでもいいし…
で、継続中…
どうしても Tomcat が動かないんだよねぇ….前項までの工程だと…
Tomcat なんで、いじらなくなって久しいので、もう、設定の修正するあたりをつけられない…
で、見直して、 VMWare になったところ…
2014-05-19:
libmysql-java ( JDBC ) が必要らしい
色々調べた結果、マネージャーを起動する事に成功した
cloudstack-manager をインストールする前に libmysql-java を入れると良い
その後、このページの通りに実行する
で、この後、tomcat6 が起動し、cloudstack-manager が起動していない
スクリプトのチューニングは後にするとして、
sudo /etc/init.d/tomcat6 stop
sudo /etc/init.d/cloudstack-manager restart
でマネージャーが起動するので、ブラウザで表示させれば良い
admin
password で初期設定されている
原因確認完了
未推敲
次稿はブラウザーベースの使い方と、vSphere の接続かな?